Monthly Archives: July 2013

Fillings: Composite Resin & Hidden decay

Today I am sharing a case on composite resin fillings to show the importance of radiographs in a thorough dental checkup to detect hidden decayed cavities.

Dark shadows can be detected, though challenging to the untrained eye. Decayed teeth shown (Yellow arrows) on radiograph.

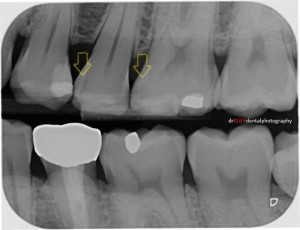
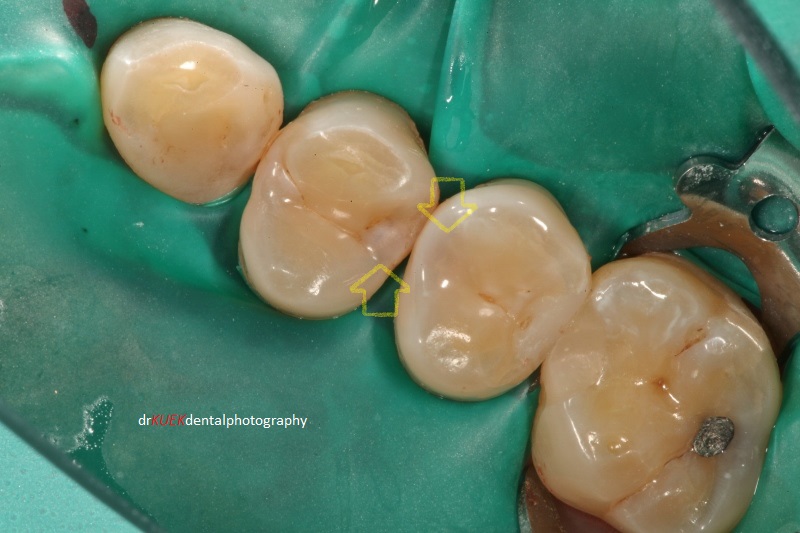
Dark shadows were detected, though challenging to the untrained eye. Decayed teeth shown (yellow arrows) on radiograph.

Mr Smith had some decay / cavities in his teeth. Although they were not obvious with a visual examination, they could be detected on the radiograph taken during his dental checkup.

Teeth are isolated =with rubber dam. Decayed teeth were below these areas (yellow arrows). Triodent wave-wedges (pink) were used to pre-wedge these teeth, important for good contacts in the final results.

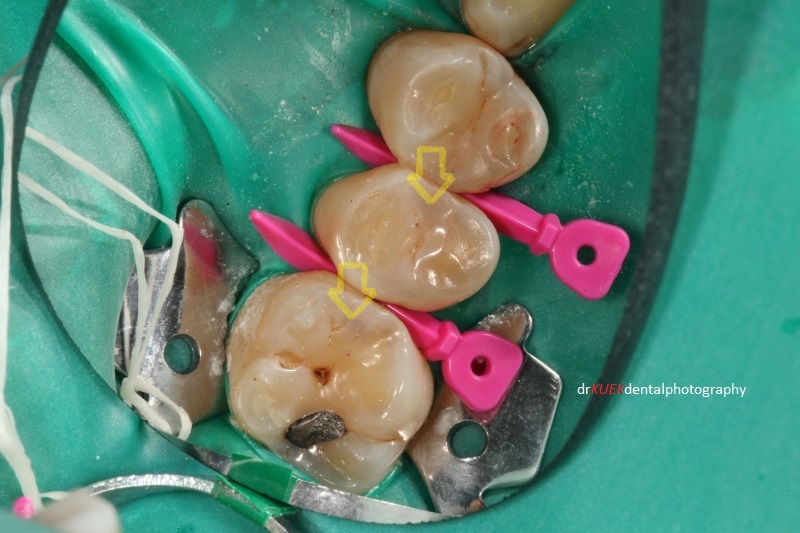
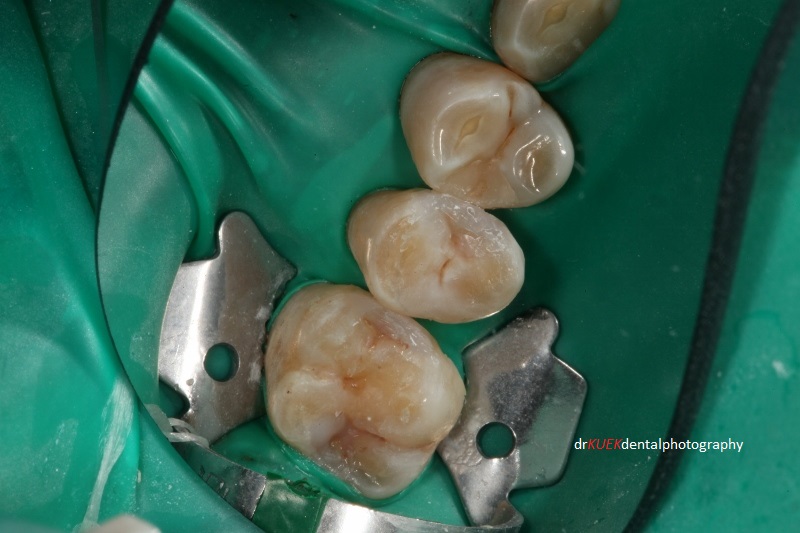
Cavities were located below the areas marked by the yellow arrows. Teeth were isolated with a rubber dam. Triodent wave-wedges (pink) were used to pre-wedge these teeth, important for good teeth contacts in the final results.

IMG_6722 (800x533)

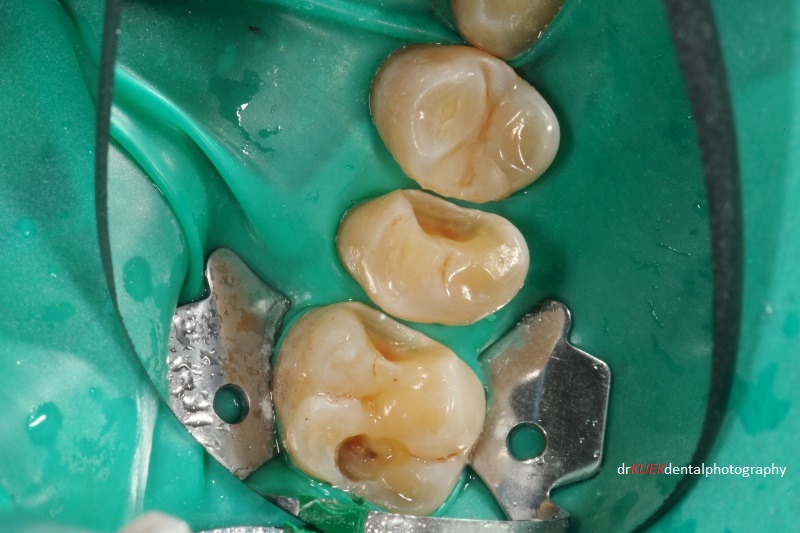
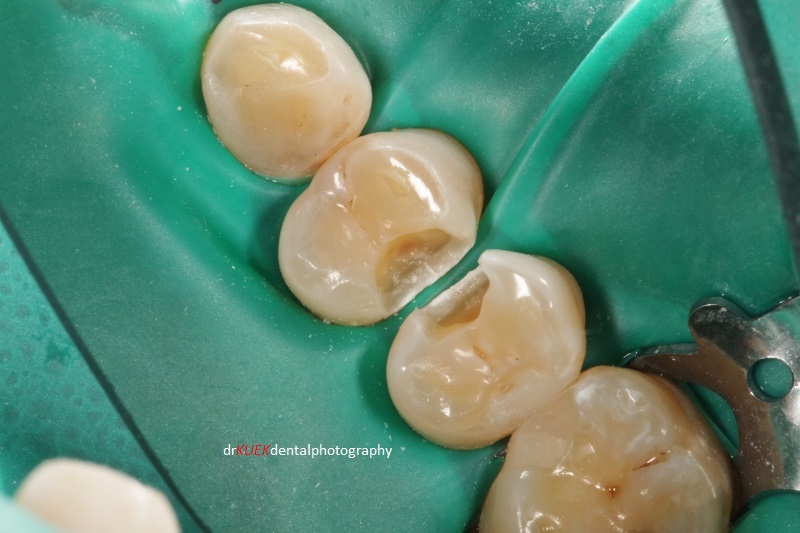
The existing amalgam filling with poor margins was removed, which revealed more decay.

The routine preparations were done to set up Mr Smith for his fillings. Once the teeth were nicely numbed, isolated and comfortable, our little project began. While I work, I always hold a mental picture of the final result that I want to achieve in terms of shape and aesthetics.

Decayed teeth areas were cleaned and inspected carefully.

There was decay under the existing amalgam filling. Natural grooves in this molar tooth were also cleaned even though they were not decayed. I routinely seal these grooves if part of the tooth being worked on needed a filling (yellow arrows).

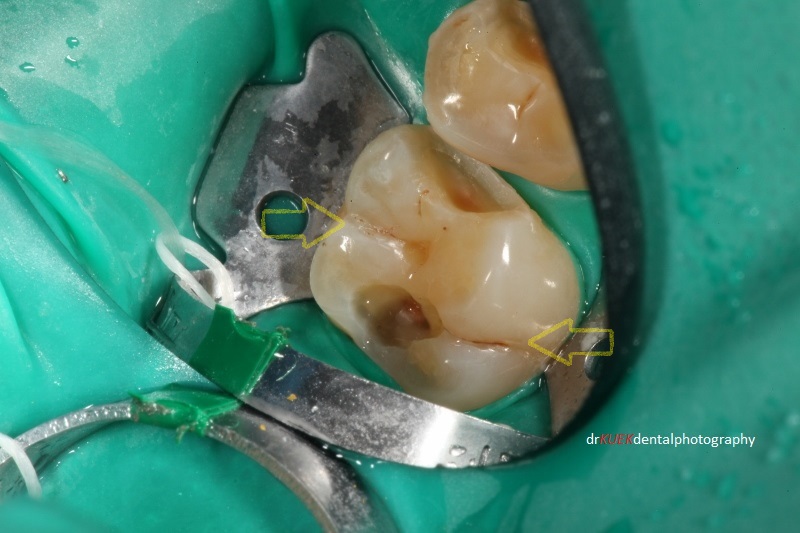
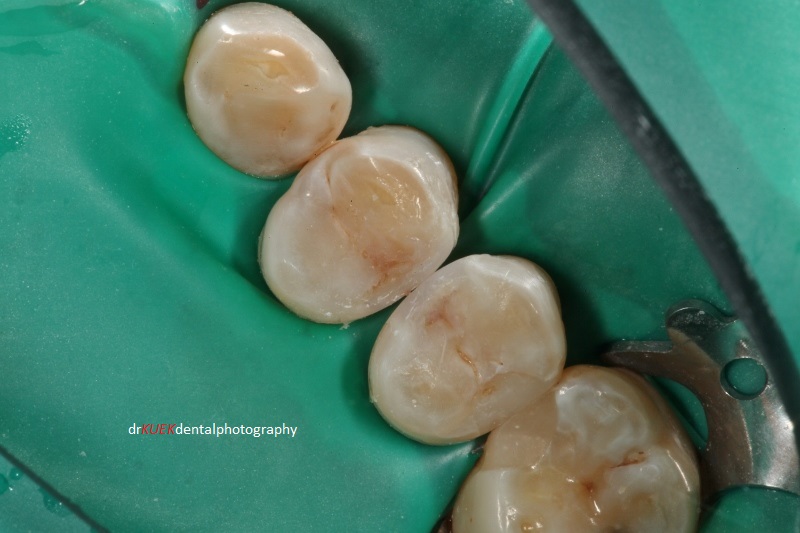
Natural grooves in this molar tooth were cleaned even though they were not decayed (yellow arrows). I then sealed these grooves to reduce the risk of future decay.

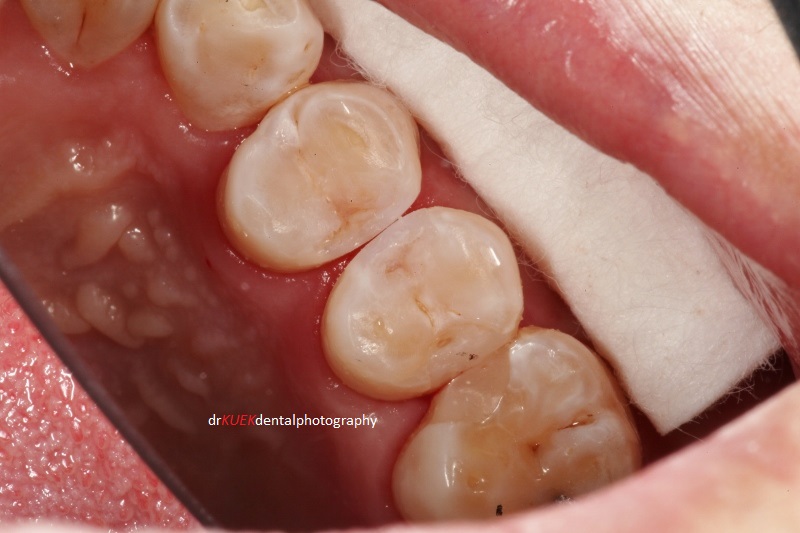
With the Triodent V3-ring and sectional matrix system (not shown – will try to in future posts), composite resin materials were carefully placed and sculpted. Placements were done in small increments and in a specific manner (I will share how it is done in the future). This is important to minimize the risk of Mr Smith feeling sensitive from these teeth later on and also ensures longer-lasting fillings. Tints were used to highlight and re-create the natural shape and aesthetics of the teeth, blending in the fillings with the natural teeth.

Shades of composite resin materials were chosen and tints were used to create the fillings, aimed to blend the fillings with the natural teeth.

Shades of composite resin materials were chosen and tints used to create the fillings, aiming to blend the fillings with the natural teeth.

Mr Smith is very glad that his teeth are fixed now.
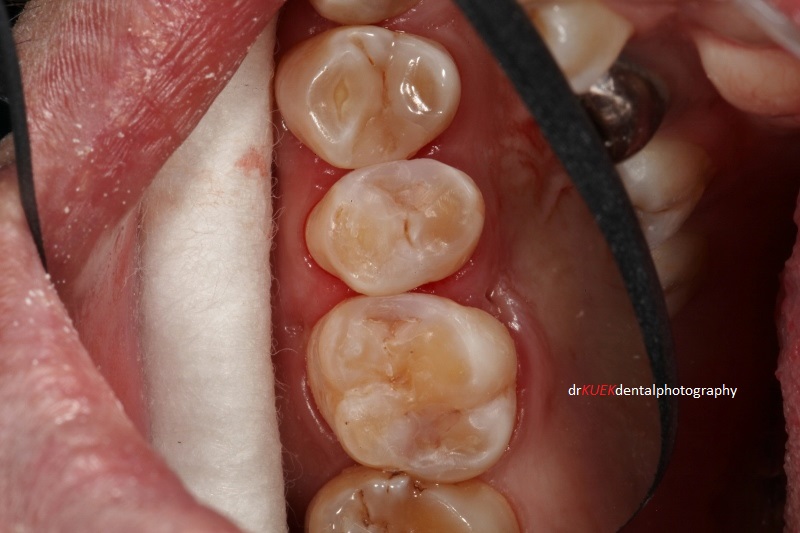
Fillings completed

Fillings completed

Continue reading

Fillings: Composite Resin. Where are the decayed cavities?

Decayed cavities are hidden here (yellow arrows). The areas are slightly darker in colour.

Decayed cavities are hidden here (yellow arrows). The areas are slightly darker in colour.

This case I am sharing is about composite resin fillings for teeth with decay.

The green background below the teeth is called a ‘dental rubber dam’. Dentists today and many patients as well, choose to use composite resin to fill teeth. A rubber dam isolates teeth, keeping out moisture and saliva that would otherwise interfere with composite resin placement. If contamination occurs, the longevity of these fillings will be compromised and new decay could form around the fillings.

Pre-wedge done with Triodent Wave-wedge, to ensure good contact between these teeth at the final result. Decayed cavities were exposed and seen as brownish softened teeth. The whitish areas between the teeth were caused by demineralization by bacterial acid found in plaque and calculus, a process of tooth decay.

Pre-wedge done with Triodent Wave-wedge, to ensure good contact between these teeth at the final result. Decayed cavities were exposed and seen as brownish softened teeth. The whitish areas between the teeth were caused by demineralization by bacterial acid found in plaque and calculus, a process of tooth decay.

 Once the decayed areas are cleaned and proper shade selections made, composite resin materials are placed and sculpted.

Decayed areas cleaned. Hard and sound enamel left in place, even though appeared whitish. Often 'chasing' demineralized enamel is not necessary as it will deepen the cavity. However, I always advise periodic radiograph reviews to check these areas and of course, Mr Smith has to maintain good oral hygiene.

Decayed areas cleaned. Hard and sound enamel left in place, even though appeared whitish. Often ‘chasing’ demineralized enamel is not necessary as it will deepen the cavity. However, I always advise periodic radiograph reviews to check these areas and of course, Mr Smith has to maintain good oral hygiene.

Composite resin sculpted to follow the natural teeth shape. Tints used to highlight and blend the fillings with the teeth. Contact between these teeth were built using Triodent V3-ring and their matrix system. Note: the other 2 fillings between the lower and second lower teeth in this photograph were done 7.5 years ago by, yours truly. At that time, I had less choices of composite resin shades and no access to tints. One shade of composite resin was used (Esthet X, not the HD version) with the first Triodent V-ring system. Aesthetically is acceptable and functionally is still 100%. The method of placing these composite resin fillings have not changed very much over the years of my practice. Hence, I believe with proper and careful technique, composite resin fillings can be long lasting.

Composite resin sculpted to follow the natural teeth shape. Tints used to highlight and blend the fillings with the teeth. Contact between these teeth were built using Triodent V3-ring and their matrix system.
Note: the other 2 fillings between the lower and second lower teeth in this photograph were done 7.5 years ago by, yours truly. At that time, I had less choices of composite resin shades and no access to tints. One shade of composite resin was used (Esthet X, not the HD version) with the first Triodent V-ring system. Aesthetically is acceptable and functionally is still 100%. The method of placing these composite resin fillings have not changed very much over the years of my practice. Hence, I believe with proper and careful technique, composite resin fillings can be long lasting.

Composite resin and tints are very good filling materials dentists use to create aesthetic and natural looking teeth. Proper techniques and careful placement are important to create these fillings where ultimately, the patients benefit from long lasting results.

Fillings completed

Fillings completed

  Mr Smith was definitely happy that his teeth are good again!

Continue reading

Implant & Crown: What do you do with that implant screw access hole?

A crown supported by a dental implant is a VERY effective solution for someone who has a missing tooth.

Implant supported crown. Aim was for a near tooth like appearance as the crown has an overlay of porcelain. Seen here the screw access hole, where a screw is used to hold the crown in place on the implant below.

Implant supported crown. Aim was for a near tooth like appearance as the crown has an overlay of porcelain. Seen here the screw access hole, where a screw is used to hold the crown in place on the implant below.

Often the crown is placed on the implant and held down firmly with a little screw. However, that leaves a hole in the crown and could be unsightly. In most situations, a dentist would then place a filling, either an amalgam restoration or a composite resin restoration to cover that hole.

Screw access hole sealed with composite resin and tints. Porcelain bonding technique was used. Aesthetic of the crown is made better with the nicely sculpted composite resin and highlighted with tints to blend the crown with the neighbouring teeth.

Screw access hole sealed with composite resin and tints. Porcelain bonding technique was used. Aesthetic of the crown is made better with the nicely sculpted composite resin and highlighted with tints to blend the crown with the neighbouring teeth.

This implant and crown is replacing Mrs Smith’s missing lower molar tooth. What I have done here, is a composite resin material placed to seal the screw access hole. The composite resin is sculpted to blend with the anatomy and characteristics built into the porcelain of the crown. Composite resin stains or tints are used to highlight the natural appearance so that it blends in with the neighbouring natural teeth.

This tooth replacement is functional and aesthetic. Mrs Smith is happy her tooth is back, not just an implant.

  Continue reading